跳至內容

antony@notes:~/suse$ cat "Registering-SUSE-Liberty-Linux-7-Clients.md"

Registering SUSE Liberty Linux 7 Clients

2024-01-15· SUSE ·SUSE Manager

Preface

本篇文章會介紹,如何成功將 SUSE Liberty Linux 7 Client 註冊到 SUSE Manager Server

可以透過點擊展開以下目錄,選擇想看的內容,跳轉至特定章節

1. 注意事項

  1. SUSE Liberty Linux clients 指的就是將 Red Hat Enterprise Linux 或是 CentOS 系統的 Packages Repository 換成 SUSE Liberty Linux 的套件儲存庫。

SUSE Liberty Linux clients 有時候也被稱為以下 4 種名稱

  • SUSE Linux Enterprise Server with Expanded Support (SLESES)
  • Liberty
  • RES
  • Red Hat Expanded Support.
  1. SUSE Liberty Linux software channels 僅提供套件的更新,不提供套件本身
  2. 要註冊 SUSE Liberty Linux Client,需要在 SUSE Manager Server 新增 SUSE Liberty Linux Product 以建立必要的基本頻道,然後將任何必需的 Red Hat 或 CentOS 套件匯入為自訂子頻道。
  3. 必須直接從 Red Hat 或 CentOS 獲得 initial packages ( 初始套件 ),然後才能套用由 SUSE Liberty Linux 軟體頻道提供的更新。

2. 在 SUSE Manager Server 新增 Software Channels

2.1. 系統要求

  • SUSE Manager Server 的 /var/spacewalk 目錄區剩餘空間量,必須有 600 G 以上的剩餘空間

2.2. 注意事項

SUSE Liberty Linux 的某些必需套件包含在 Red Hat Enterprise Linux 或 CentOS installation media 中,在註冊 SUSE Liberty Linux 客戶端之前,您必須先安裝這些套件。

  • SUSE Liberty Linux 產品由 SUSE Custom Center 提供,這也包括客戶端工具套件。
  • 在將 SUSE Liberty Linux 客戶端註冊到 SUSE Manager Server 之前,您需要添加所需的 software channels 並同步它們。
  • 您需要選擇兩組不同的通道,一組是 SUSE Liberty Linux,另一組是 Client Tools.。
  • 需要與正確的 SUSE Liberty Linux channels 關聯的 activation key。

2.3. 開始新增 Software Channels

以下 WebUI 和 CLI 的操作步驟選擇其中一種執行即可

2.3.1 使用 WebUI 操作步驟

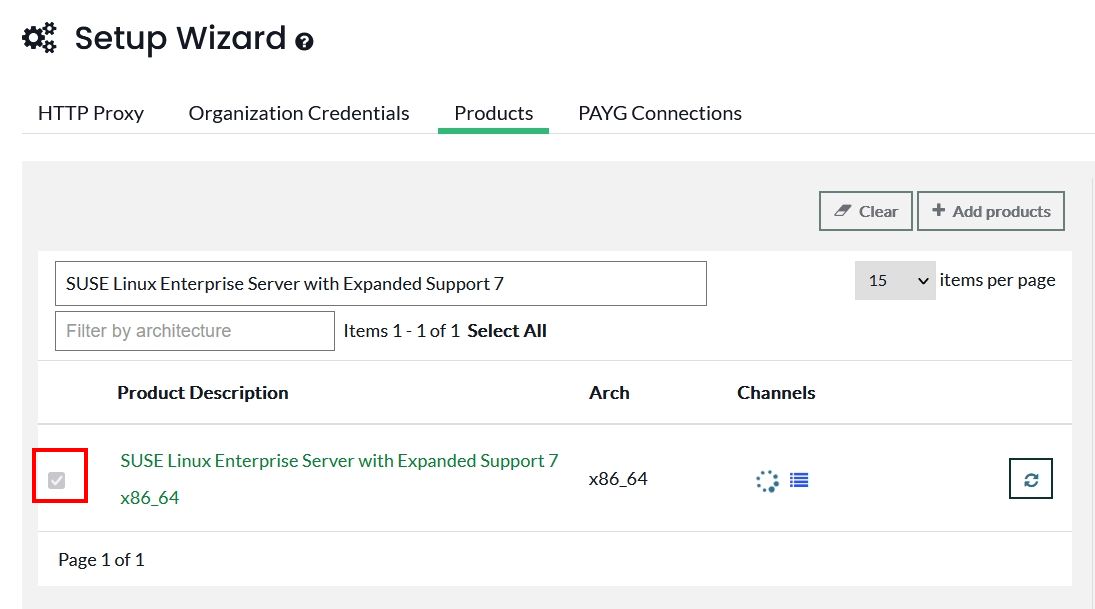
  1. 勾選要加入的 SUSE Liberty Linux (版本)
  2. 點擊 “Add product” ,然後等待同步完成

image.png

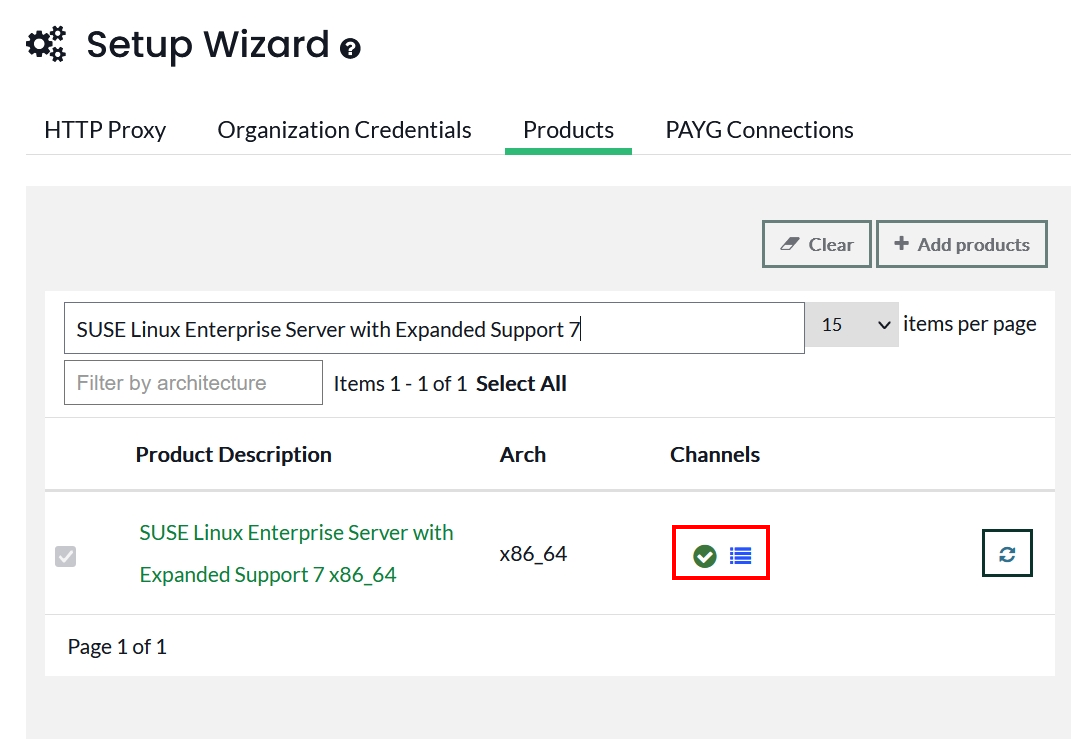
  1. 確認同步完成

在 Channels 欄位呈現綠勾勾的圖示,代表完成同步

image.png

2.3.2. 使用 CLI 操作步驟

連線至 SUSE Manager Server,並使用具有系統管理員權限的使用者帳號執行以下命令

$ sudo mgr-sync add channel rhel-x86_64-server-7 

輸入 SUSE Manager 管理員的帳號密碼

螢幕輸出 :

Please enter the credentials of SUSE Manager Administrator.
Login: admin
Password:
Added 'rhel-x86_64-server-7' channel
Scheduling reposync for following channels:
- rhel-x86_64-server-7

2.4. SUSE Liberty Linux 在 SUSE Manager 上的資訊

下表是 SUSE Liberty Linux 每個版本對應的 Product 名稱 :

OS VersionProduct Name
SUSE Liberty Linux 7SUSE Linux Enterprise Server with Expanded Support 7 x86_64
SUSE Liberty Linux 8RHEL or SLES ES or CentOS 8 Base x86_64
SUSE Liberty Linux 9RHEL and Liberty 9 Base x86_64

下表是 SUSE Liberty Linux 每個版本對應的 Base Channel 和 Client Tools Channel :

SUSE Liberty LinuxBase ChannelTools Channel
7RHEL Expanded Support 7RES7-SUSE-Manager-Tools x86_64
8RHEL or SLES ES or CentOS 8 BaseRES8-Manager-Tools-Pool for x86_64 and RES8-Manager-Tools-Updates for x86_64
9RHEL and Liberty 9 BaseEL9-Manager-Tools-Pool for x86_64 and EL9-Manager-Tools-Updates for x86_64

2.5. 檢視 Product 下載過程

以 SUSE Liberty Linux 7 為例,這個 Product 有 3 個必要的 Channel

res7-suse-manager-tools-x86_64
res7-x86_64
rhel-x86_64-server-7

2.5.1. 檢視下載 res7-suse-manager-tools-x86_64 Channel 的 log 資訊

$ sudo tail -f /var/log/rhn/reposync/res7-suse-manager-tools-x86_64.log

螢幕輸出應該要看到類似以下資訊 :

2023/11/06 10:13:14 +08:00 Command: ['/usr/bin/spacewalk-repo-sync', '--channel', 'res7-suse-manager-tools-x86_64', '--type', 'yum', '--non-interactive']
2023/11/06 10:13:14 +08:00 Sync of channel started.
2023/11/06 10:13:23 +08:00 Repo URL: https://updates.suse.com/repo/$RCE/RES7-SUSE-Manager-Tools/x86_64/?<token>
2023/11/06 10:13:23 +08:00     Packages in repo:              1667
2023/11/06 10:13:28 +08:00     Packages already synced:        572
2023/11/06 10:13:28 +08:00     Packages to sync:              1095
2023/11/06 10:13:29 +08:00     New packages to download:      1095
2023/11/06 10:13:29 +08:00   Downloading packages:
2023/11/06 10:13:31 +08:00     1/1095 : golang-github-QubitProducts-exporter_exporter-0.4.0-4.1.x86_64.rpm
...中間省略
2023/11/06 10:17:55 +08:00     1093/1095 : zeromq-devel-4.0.5-14.1.x86_64.rpm
2023/11/06 10:17:55 +08:00     1094/1095 : zeromq-devel-4.0.5-5.1.x86_64.rpm
2023/11/06 10:17:55 +08:00     1095/1095 : zeromq-devel-4.0.5-8.1.x86_64.rpm
...中間省略
2023/11/06 10:17:56 +08:00 Importing packages started.
2023/11/06 10:17:56 +08:00
2023/11/06 10:17:56 +08:00   Importing packages to DB:
2023/11/06 10:21:40 +08:00   Package batch #1 of 55 completed...
...中間省略
2023/11/06 10:28:52 +08:00     Syncing 107 new patch(es) to channel.
2023/11/06 10:28:56 +08:00   Regenerating bootstrap repositories.
2023/11/06 10:30:19 +08:00 Sync completed.
  • 下載完成後會在 log 檔中看到 Sync completed. 代表完成

2.5.2.檢視下載 res7-x86_64 Channel 的 log 資訊

$ sudo tail -f /var/log/rhn/reposync/res7-x86_64.log

螢幕輸出應該要看到類似以下資訊 :

2023/11/06 09:32:29 +08:00 Command: ['/usr/bin/spacewalk-repo-sync', '--channel', 'res7-x86_64', '--type', 'yum', '--non-interactive']2023/11/06 09:32:29 +08:00 Sync of channel started.
2023/11/06 10:30:20 +08:00 Command: ['/usr/bin/spacewalk-repo-sync', '--channel', 'res7-x86_64', '--type', 'yum', '--non-interactive']
2023/11/06 10:30:20 +08:00 Sync of channel started.
2023/11/06 10:30:47 +08:00 Repo URL: https://updates.suse.com/repo/$RCE/RES7/x86_64/?<token>
2023/11/06 10:30:47 +08:00     Packages in repo:             582792023/11/06 10:33:39 +08:00     Packages already synced:          02023/11/06 10:33:39 +08:00     Packages to sync:             582792023/11/06 10:33:43 +08:00     New packages to download:     582792023/11/06 10:33:43 +08:00   Downloading packages:
2023/11/06 10:33:45 +08:00     1/58279 : 389-ds-base-1.3.1.6-26.el7_0.x86_64.rpm
...中間省略
2023/11/07 09:54:06 +08:00 Add Patch RHSA-2023:5761
2023/11/07 09:54:06 +08:00     Syncing 6299 new patch(es) to channel.
2023/11/07 09:56:37 +08:00   Regenerating bootstrap repositories.
2023/11/07 09:57:04 +08:00 Sync completed.

2.5.3.檢視下載 rhel-x86_64-server-7 Channel 的 log 資訊

$ sudo tail -f /var/log/rhn/reposync/rhel-x86_64-server-7.log

螢幕輸出應該要看到類似以下資訊 :

2023/11/06 09:32:26 +08:00 Command: ['/usr/bin/spacewalk-repo-sync', '--channel', 'rhel-x86_64-server-7', '--type', 'yum', '--non-interactive']
2023/11/06 09:32:26 +08:00 Sync of channel started.
2023/11/06 09:32:27 +08:00 Repo URL: http://localhost/pub/repositories/empty/
2023/11/06 09:32:27 +08:00     Packages in repo:                 0
2023/11/06 09:32:27 +08:00     No new packages to sync.
2023/11/06 09:32:27 +08:00
2023/11/06 09:32:27 +08:00   Patches in repo: 0.
2023/11/06 09:32:28 +08:00 Sync completed.

2.6. Trouble Shooting

2.6.1. 透過 CLI 重新同步 Channel

$ sudo mgr-sync sync channel <channel_name>

2.6.2. 在 SCC 有新增 Product 的訂閱,但是 SUSE Manager Server 沒有認到

Refresh the local copy of products, channels, and subscriptions

$ sudo mgr-sync -d 3 refresh

2.6.3. mgr-sync log 檔案所在的位置

3. 新增 Base Media

3.1. 注意事項

  1. SUSE Liberty Linux 的 base channel 沒有任何套件,因為 SUSE 沒有提供 Red Hat Enterprise Linux 或 CentOS 的 base media。
  2. 需要從 Red Hat 或 CentOS 取得 base media,並將其新增為 SUSE Liberty Linux parent channel 的 child channel。為了確保有需要的所有套件,請使用完整的 DVD image,而不是最小或 JeOS image。
  3. 可以使用 SUSE Manager custom channels 來設定 Red Hat Enterprise Linux 或 CentOS 的 media。base media 上的所有套件都必須 mirror 到 child channel。

3.2. 建立 CentOS 7 Custom Channels

  1. 使用 SUSE Manager Server 管理員帳號登入
$ spacecmd -- login <admin_name>
> enter admin password
  1. 建立 CentOS 7 Custom Channel
$ spacecmd -- softwarechannel_create -n "Centos7 Media" -l centos7-media -p rhel-x86_64-server-7 -a x86_64

3.3. 將 CentOS 7 的 Base Media 加到 Custom Channels 中

  1. 在 SUSE Manager Server 的 /tmp 目錄區底下準備 CentOS 7 的 ISO 檔
$ curl -# -L http://ftp.twaren.net/Linux/CentOS/7.9.2009/isos/x86_64/CentOS-7-x86_64-DVD-2009.iso -o /tmp/CentOS-7-x86_64-DVD-2009.iso

螢幕輸出 :

############################################################################ 100.0%
  1. 建立一個包含 media 內容的目錄,用 sll7sll8sll9 取代 <os_name>
$ sudo mkdir -p /srv/www/htdocs/pub/<os_name>
  1. 將 CentOS-7 的 image 掛載到 /srv/www/htdocs/pub/sll7 目錄區
$ sudo mount -o loop /tmp/CentOS-7-x86_64-DVD-2009.iso /srv/www/htdocs/pub/sll7
  1. 將 Packages 匯入到先前建立的 Custom Channel 中
$ sudo spacewalk-repo-sync -c centos7-media -u file:///srv/www/htdocs/pub/sll7/

螢幕輸出 :

...以上省略
14:29:08 Sync completed.
14:29:08 Total time: 0:32:04
  1. umont /srv/www/htdocs/pub/sll7
$ umount /srv/www/htdocs/pub/sll7

3.4. 建立 RHEL 7 Custom Channels

  1. 建立 RHEL 7 Custom Channel
$ spacecmd -- softwarechannel_create -n "RHEL Media" -l rhel-media -p rhel-x86_64-server-7 -a x86_64

3.3. 將 RHEL 7 的 Base Media 加到 Custom Channels 中

  1. 在 SUSE Manager Server 的 /tmp 目錄區底下準備 RHEL 7 的 ISO 檔
$ ls -l /tmp/rhel-server-7.9-x86_64-dvd.iso

螢幕輸出 :

-rw-r--r-- 1 root root 4526702592 Jan 11 14:20 /tmp/rhel-server-7.9-x86_64-dvd.iso
  1. 建立一個包含 media 內容的目錄,用 sll7sll8sll9 取代 <os_name>
$ sudo mkdir -p /srv/www/htdocs/pub/<os_name>
  1. 將 CentOS-7 的 image 掛載到 /srv/www/htdocs/pub/sll7 目錄區
$ sudo mount -o loop /tmp/rhel-server-7.9-x86_64-dvd.iso /srv/www/htdocs/pub/sll7
  1. 將 Packages 匯入到先前建立的 Custom Channel 中
$ sudo spacewalk-repo-sync -c rhel-media -u file:///srv/www/htdocs/pub/sll7/

螢幕輸出 :

...以上省略
15:42:34   Linking packages to the channel.
15:42:41     1000 packages linked
15:43:03     2000 packages linked
15:43:50     3000 packages linked
15:43:52     4000 packages linked
15:43:54     5000 packages linked
15:43:55     5230 packages linked
15:43:55
15:43:55   Patches in repo: 0.
15:43:56   Regenerating bootstrap repositories.
Generating bootstrap repos for all available products which had changes.
Nothing to do.
15:43:58 Sync completed.
15:43:58 Total time: 0:07:42

4. 將 CentOS 7 註冊為 SUSE Liberty Linux Clients

4.1. 手動創建用戶端倉庫

在 SUSE Manager Server 執行以下命令

$ sudo mgr-create-bootstrap-repo --create RES7-x86_64

4.2. 創建 Activation_Key

$ spacecmd -- activationkey_create \
-n liberty-linux-centos-7 \
-d liberty-linux-centos-7 \
-b rhel-x86_64-server-7 \
-e virtualization_host

activationkey_create 參數介紹 :

4.2.1 將 Centos-7 Base Media channel 加入 activation key

$ spacecmd -- activationkey_addchildchannels 1-liberty-linux-centos-7 centos7-media

4.3. 創建 Bootstrap Script

$ sudo mgr-bootstrap --activation-key=1-liberty-linux-centos-7 --script=bootstrap-liberty-linux-centos-7.sh

4.4. 在 CentOS-7 執行 Bootstrap Script 註冊

請連線到 CentOS 7 的主機,執行以下命令

$ curl -k https://<SUMA_FQDN>/pub/bootstrap/bootstrap-liberty-linux-centos-7.sh | sudo bash

螢幕輸出 :

......................以上省略
REGISTRATION
------------
* registering
Using activation key: 1-liberty-linux-7
* removing TLS certificate used for bootstrap
  (will be re-added via salt state)
* starting salt daemon and enabling it during boot
Created symlink from /etc/systemd/system/multi-user.target.wants/venv-salt-minion.service to /usr/lib/systemd/system/venv-salt-minion.service.
-bootstrap complete-

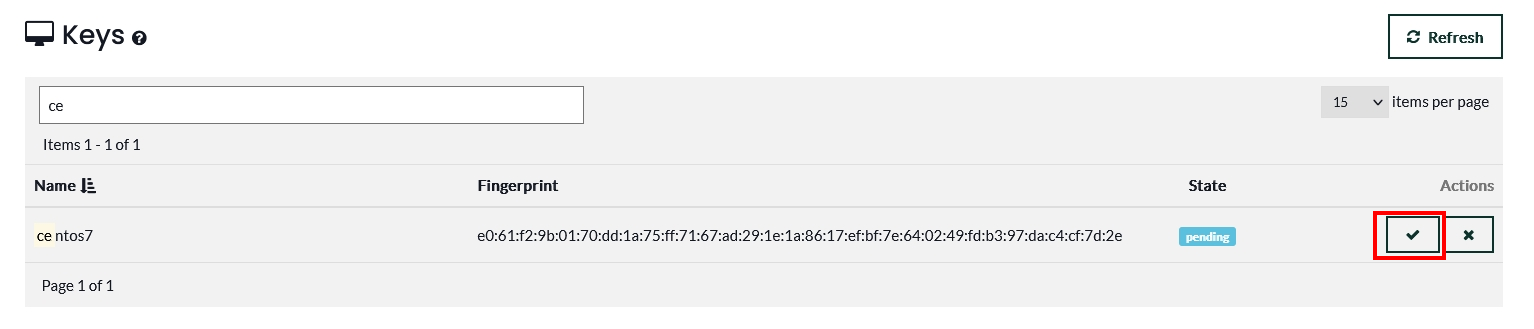
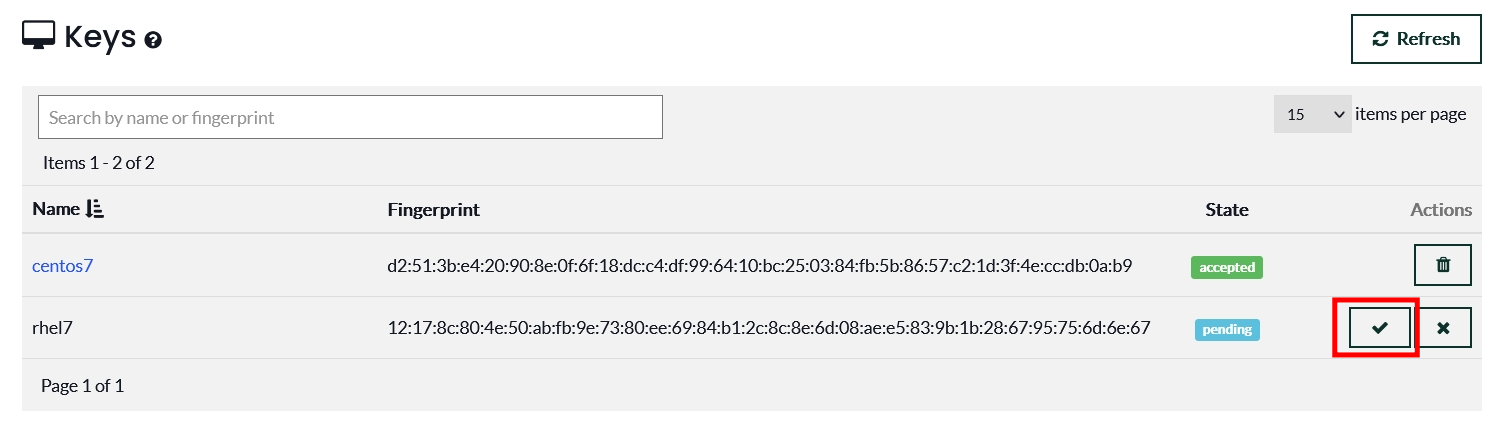
4.5. 在 SUSE Manager Web UI 上同意 Salt Key

點擊左側選單 Salt -> Keys image

4.6. 檢查 Packages Repository

執行以下命令,列出已啟用的 Packages Repository

$ sudo yum repolist enabled

螢幕輸出 :

Loaded plugins: fastestmirror, langpacks, susemanagerplugin, venv-yumnotify
Loading mirror speeds from cached hostfile
repo id                                                               repo name                                                 status
susemanager:centos7-media                                             Centos7 Media                                              4,070
susemanager:res7-suse-manager-tools-x86_64                            RES7 SUSE-Manager-Tools x86_64                             1,111
susemanager:res7-x86_64                                               RES7 for x86_64                                           58,516
susemanager:rhel-x86_64-server-7                                      RHEL x86_64 Server 7                                           0
repolist: 63,697

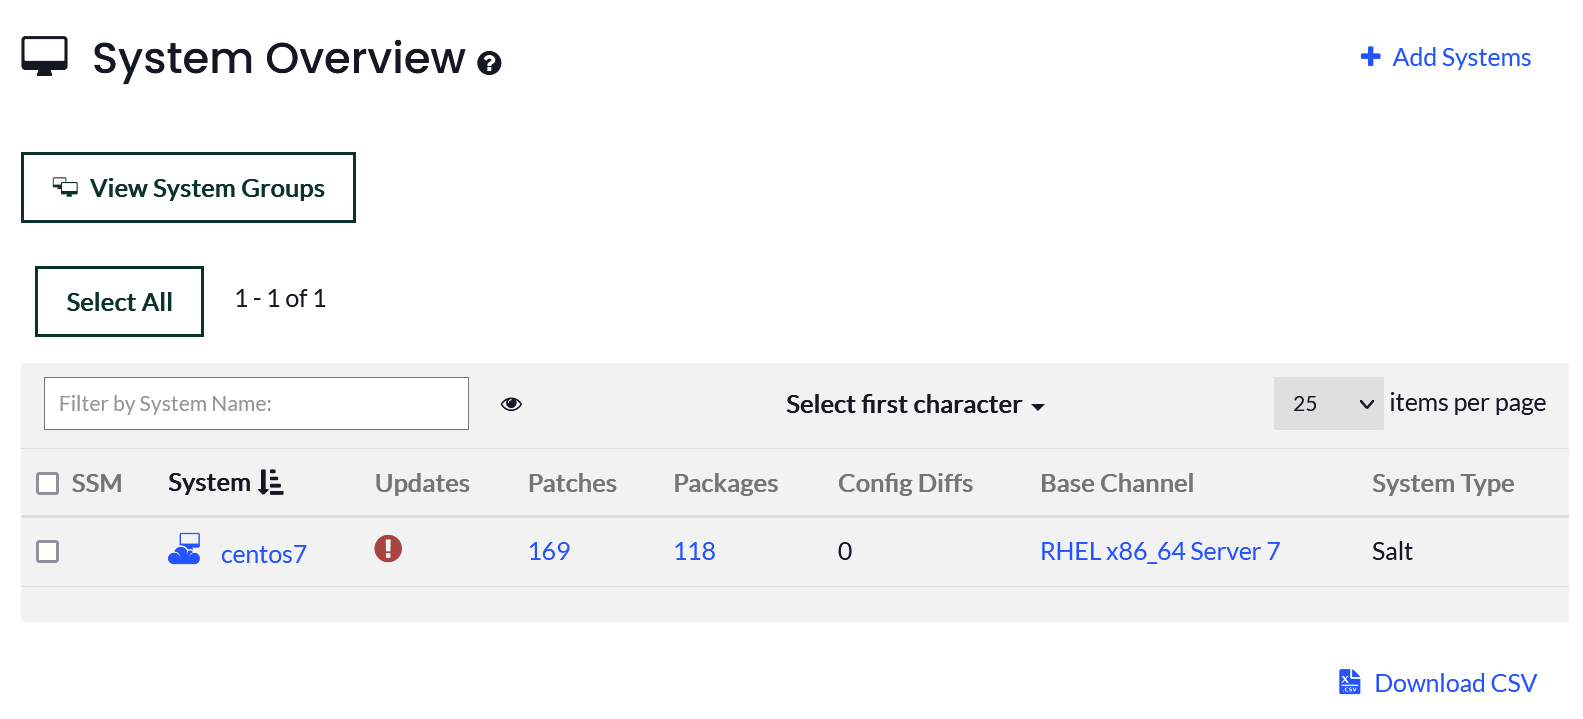
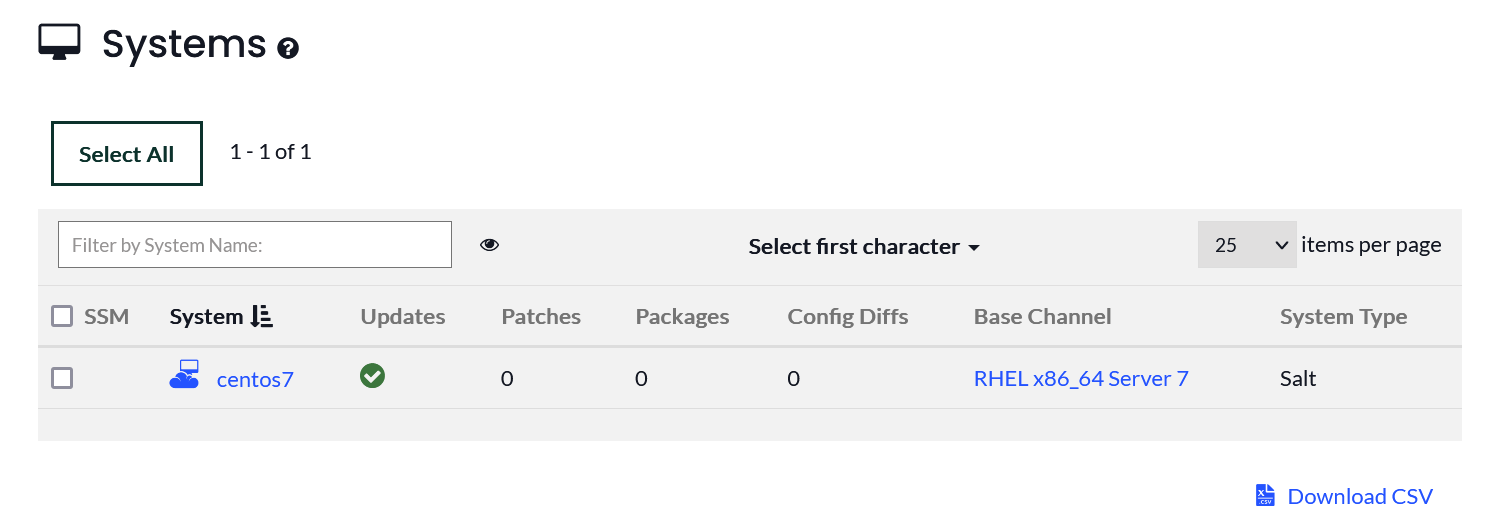
4.6.1 在 SUSE Manager Server Web UI 檢視 Client 端的資訊

SUSEManager > Systems > Overview

image

4.6.2 透過 CLI 的方式檢查 Client 系統資訊

在 SUSE Manager Server 執行以下命令

$ spacecmd -q -- system_details centos7

螢幕輸出 :

Name:          centos7
System ID:     1000010026
UUID:          f8167264b57240cd950413eb2dfbe7f8
Locked:        False
Registered:    20231109T16:10:22
Last Checkin:  20231109T16:12:13
OSA Status:    unknown
Last Boot:     20231109T16:01:58
Contact Method:default

Hostname:      centos7
IP Address:    x.x.x.x
Kernel:        3.10.0-1160.el7.x86_64

Activation Keys
---------------
1-liberty-linux-7

Software Channels
-----------------
rhel-x86_64-server-7
  |-- res7-x86_64
  |-- res7-suse-manager-tools-x86_64
  |-- centos7-media

Entitlements
------------
salt_entitled

System Groups
-------------

4.7. 測試系統更新

在 SUSE Manager Client 執行以下命令

$ sudo yum update

螢幕輸出 :

... 以上省略
Transaction Summary
==================================================================
Install    1 Package  (+1 Dependent package)
Upgrade  153 Packages

Total download size: 289 M
Is this ok [y/d/N]: y
Downloading packages:
Delta RPMs disabled because /usr/bin/applydeltarpm not installed.
(1/155): NetworkManager-libnm-1.18.8-2.el7_9.x86_64.rpm           | 1.7 MB  00:00:00
... 中間省略
------------------------------------------------------------------
Total                                                             40 MB/s | 289 MB  00:00:07
Running transaction check
Running transaction test
Transaction test succeeded
Running transaction

... 中間省略

Installed:
  kernel.x86_64 0:3.10.0-1160.102.1.el7

Dependency Installed:
  sles_es-release-server.x86_64 0:7.9-6.el7

Updated:
  NetworkManager.x86_64 1:1.18.8-2.el7_9 ...

Complete!

4.7.1 TroubleShooting

  1. 遇到 Transaction check error
Transaction check error:
  file /usr/share/redhat-release from install of sles_es-release-server-7.9-6.el7.x86_64 conflicts with file from package centos-release-7-9.2009.0.el7.centos.x86_64

解決辦法 : 執行以下命令,刪除 centos-release 套件

$ sudo rpm -e --nodeps centos-release-7-9.2009.0.el7.centos.x86_64

4.7.2 重啟系統

$ sudo reboot

4.7.3. 再次更新測試

$ sudo yum update

螢幕輸出應該如下 :

...以上省略
No packages marked for update

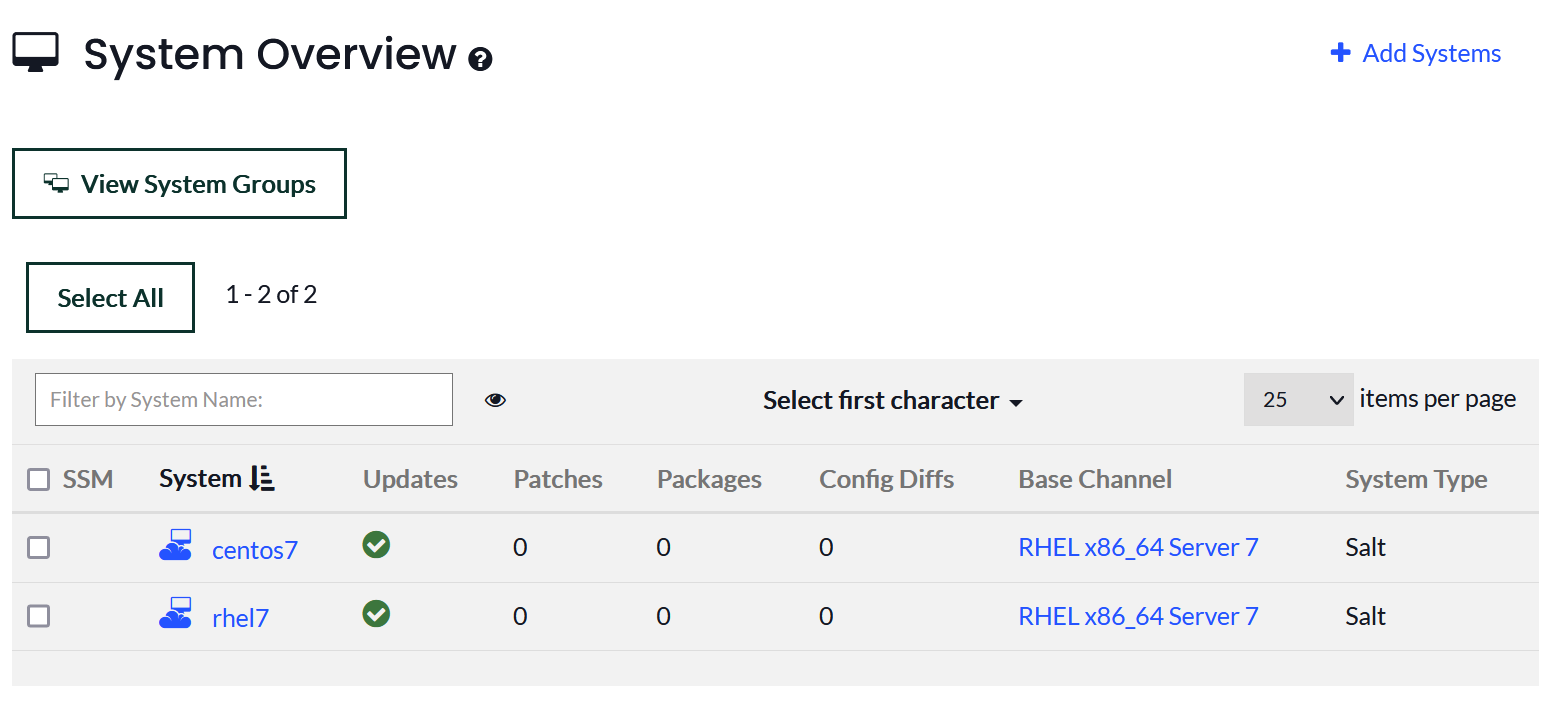
4.7.4. 在 SUSE Manager Server Web UI 檢視 Client 端的資訊

image.png

5. 將 RHEL 7 註冊為 SUSE Liberty Linux Clients

5.1. 手動刷新用戶端倉庫

在 SUSE Manager Server 執行以下命令

$ sudo mgr-create-bootstrap-repo --create RES7-x86_64

5.1. 創建 Activation_Key

$ spacecmd -- activationkey_create \
-n liberty-linux-rhel-7 \
-d liberty-linux-rhel-7 \
-b rhel-x86_64-server-7 \
-e virtualization_host

activationkey_create 參數介紹 :

5.1.1 將 RHEL 7 Base Media channel 加入 activation key

$ spacecmd -- activationkey_addchildchannels 1-liberty-linux-rhel-7 rhel-media

5.2. 創建 Bootstrap Script

$ sudo mgr-bootstrap --activation-key=1-liberty-linux-rhel-7 --script=bootstrap-liberty-linux-rhel-7.sh

5.3. 在 RHEL 7 執行 Bootstrap Script 註冊

請連線到 RHEL 7 的主機,執行以下命令

$ curl -k https://<SUMA_FQDN>/pub/bootstrap/bootstrap-liberty-linux-rhel-7.sh | sudo bash

螢幕輸出 :

......................以上省略
REGISTRATION
------------
* registering
Using activation key: 1-liberty-linux-rhel-7
* removing TLS certificate used for bootstrap
  (will be re-added via salt state)
* starting salt daemon and enabling it during boot
Created symlink from /etc/systemd/system/multi-user.target.wants/venv-salt-minion.service to /usr/lib/systemd/system/venv-salt-minion.service.
-bootstrap complete-

5.4. 在 SUSE Manager Web UI 上同意 Salt Key

點擊左側選單 Salt -> Keys

image

5.5. 檢查 Packages Repository

執行以下命令,列出已啟用的 Packages Repository

$ sudo yum repolist enabled

螢幕輸出 :

Loaded plugins: fastestmirror, langpacks, susemanagerplugin, venv-yumnotify
Loading mirror speeds from cached hostfile
repo id                                                               repo name                                                 status
susemanager:res7-suse-manager-tools-x86_64                            RES7 SUSE-Manager-Tools x86_64                             1,111
susemanager:res7-x86_64                                               RES7 for x86_64                                           58,516
susemanager:rhel-media                                                RHEL Media                                                 5,230
susemanager:rhel-x86_64-server-7                                      RHEL x86_64 Server 7                                           0
repolist: 64,857

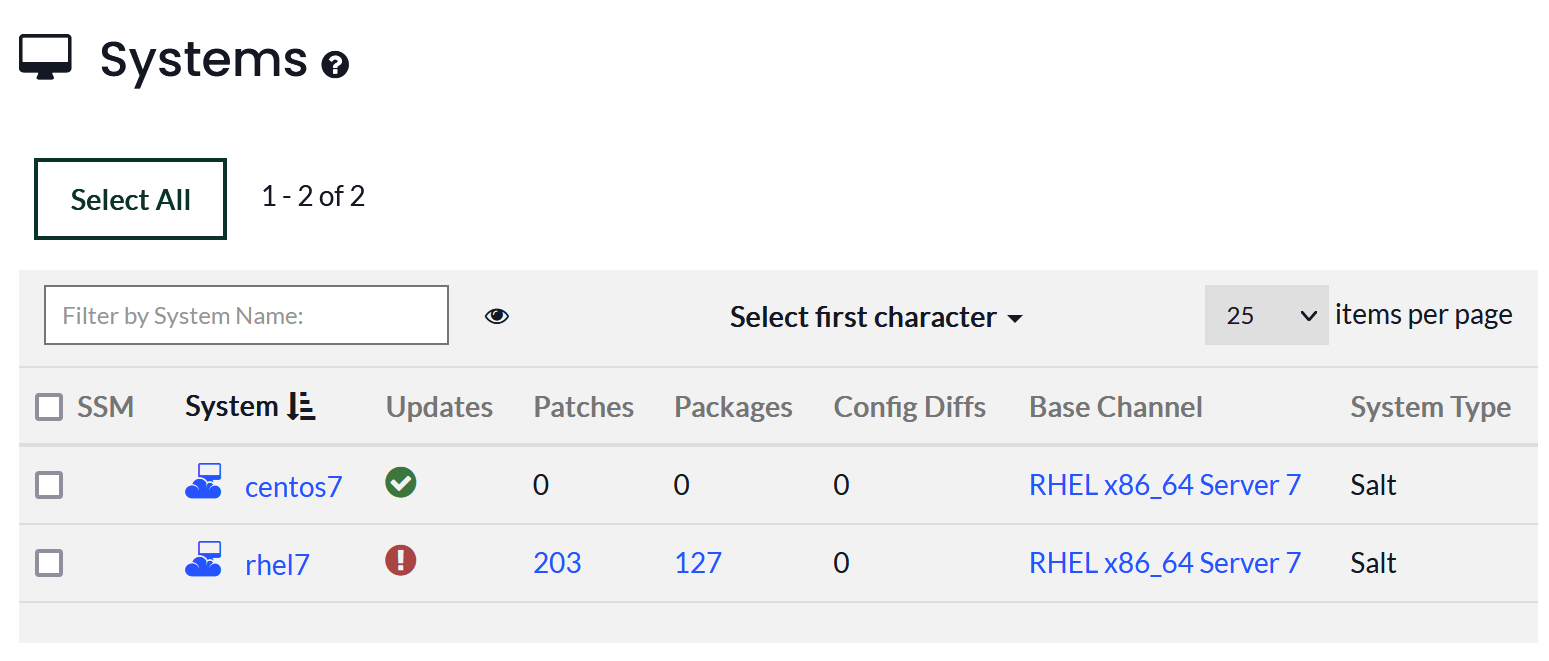
5.5.1 在 SUSE Manager Server Web UI 檢視 Client 端的資訊

SUSEManager > Systems > Overview

image

5.5.2 透過 CLI 的方式檢查 Client 系統資訊

在 SUSE Manager Server 執行以下命令

$ spacecmd -q -- system_details rhel7

如果 Web UI 上有顯示,但命令沒有,可能是 Cache 住了,執行以下命令清除

$ spacecmd -q -- clear_caches

螢幕輸出 :

Name:          rhel7
System ID:     1000010001
UUID:          cec08a0cad1348889a9465513f00fd2b
Locked:        False
Registered:    20240111T16:34:25
Last Checkin:  20240111T16:36:21
OSA Status:    unknown
Last Boot:     20240111T15:49:11
Contact Method:default

Hostname:      rhel7
IP Address:    192.168.11.95
Kernel:        3.10.0-1160.el7.x86_64

Activation Keys
---------------
1-liberty-linux-rhel-7

Software Channels
-----------------
rhel-x86_64-server-7
  |-- res7-suse-manager-tools-x86_64
  |-- res7-x86_64
  |-- rhel-media

Entitlements
------------
salt_entitled

5.6. 測試系統更新

在 SUSE Manager Client 執行以下命令

$ sudo yum update

螢幕輸出 :

... 以上省略
Transaction Summary
======================================================================================================================================
Install    9 Packages (+33 Dependent packages)
Upgrade  124 Packages

Total download size: 296 M
Is this ok [y/d/N]: y
Downloading packages:
Delta RPMs disabled because /usr/bin/applydeltarpm not installed.
(1/166): NetworkManager-1.18.8-2.el7_9.x86_64.rpm     | 1.9 MB  00:00:00
... 中間省略
------------------------------------------------------------------
Total                                                             40 MB/s | 289 MB  00:00:07
Running transaction check
Running transaction test
Transaction test succeeded
Running transaction

... 中間省略

Replaced:
  python-hwdata.noarch 0:1.7.3-4.el7       redhat-logos.noarch 0:70.7.0-1.el7 redhat-release-eula.noarch 0:7.8-0.el7
  redhat-release-server.x86_64 0:7.9-3.el7 rhn-check.x86_64 0:2.0.2-24.el7    rhn-client-tools.x86_64 0:2.0.2-24.el7
  rhn-setup.x86_64 0:2.0.2-24.el7          rhnlib.noarch 0:2.5.65-8.el7       rhnsd.x86_64 0:5.0.13-10.el7

Complete!

5.7.1 TroubleShooting

  1. 遇到 Transaction check error
Public key for spacewalk-client-setup-4.3.17-141.1.noarch.rpm is not installed

原因 : 傳統的 Red Hat Enterprise Linux 7 和 SLES Expanded Support 7 用戶端需要一些未簽署的軟體套件才能與 SUSE Manager 正常運作,因此這些用戶端類型的通道通常會取消設定該標誌 gpgcheck

解決辦法 1 : 新增參數 : --nogpgcheck

$ sudo yum update --nogpgcheck

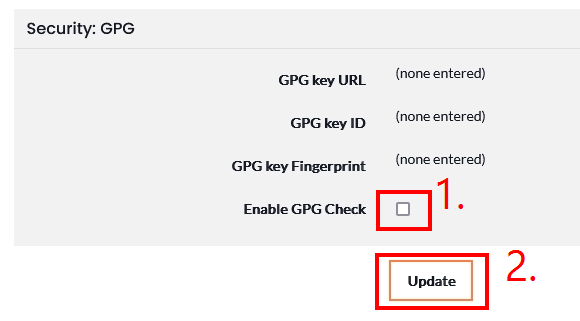
解決辦法 2 : 在 SUMA Manager Web UI 上關閉 Software Channel 的 GPGCheck

Software -> Channel List -> 展開 RHEL x86_64 Server 7,將 RHEL x86_64 Server 7RES7 for x86_64RES7 SUSE-Manager-Tools x86_64 RHEL Media 這 4 個 Software Channel 的 GPG Check 取消勾選並點擊 Update 按鈕

image

5.7.2 重啟系統

$ sudo reboot

5.7.3. 再次更新測試

$ sudo yum update

螢幕輸出應該如下 :

...以上省略
No packages marked for update

5.7.4. 在 SUSE Manager Server Web UI 檢視 Client 端的資訊

image

6. 參考資料

Registering Oracle Linux ClientsInstall SUSE Linux Enterprise Server 15 SP5